Rest of my small death korps is up on eBay for a steal! Check them out!
Monday, September 30, 2013
Death korps of kreig for sale
Saturday, September 28, 2013
Wednesday, September 25, 2013
Monday, September 23, 2013
Howling Griffons: Freehand banner
I have a full rundown on exactly my steps are for painting the howling griffon and how to make and paint the banner that I am currently working on, but unfortunately no time to sort and write up the tutorial on it! So here are a few pics to whet your appetite for when it appears.
Here is the banner for my howling griffons at around 90% done, needs final glazes for highlights and shadow but basically its all there, and my chapter master. I want all my models helmetless and beardy and grizzled.
C&C always welcome and appreciated!
thanks for watching!
Henry
Here is the banner for my howling griffons at around 90% done, needs final glazes for highlights and shadow but basically its all there, and my chapter master. I want all my models helmetless and beardy and grizzled.
C&C always welcome and appreciated!
And finally my sketches for the banner, I drew it a few times to make sure I could do it justice at such small scale. If I couldn't draw it with a pencil I knew I would struggle with a paintbrush.
Henry
Tuesday, September 17, 2013
GD entry: part 1
If I were to give the process for this fella we would be here all day. But the idea is to recreate the cover of the new space marines omnibus with the howling griffon coming out of the smoke. not sure about smoke but descending from a drop ship or some such nonsense. This mini too me 4 days to paint. About 20 hours of work. :( A quick run down on request once ive finished the mini diorama.
H
H
Saturday, September 14, 2013
Thursday, September 12, 2013
Painting with water
I'm forcing myself to improve, just joined the 'eavy metal Facebook group and realised I can't paint well. I just paint. So blending and brush control are the watch words this month! Here's the outcome of the evening painting with nothing but glazes. Time consuming but worth it!
Wednesday, September 11, 2013
Tuesday, September 10, 2013
Tutorial: Tank Weathering Part 2
Final part of this tutorial. I hope it's helped some of you with weathering, sorry it's so long winded but if I'm not clear on something please feel free to drop a comment at the bottom there.
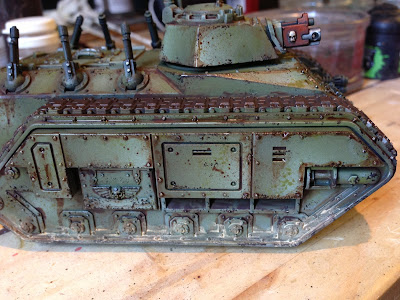
On with the show! This part will explain how to get the weathering blended nicely into the tank surroundings and briefly cover how I use weathering powders, until you achieve something like this!
1: Gloss and leaking Oil. I use Vallejo Gloss varnish for this, its exactly the same as Johnsons Klear that unfortunately no longer exists except in boxes under the stairs of professional model painters.
Once the oil streaks we painted in from part one of this tutorial are dry (shouldnt be more than 30mins -1hour depending on how much oil paint you used.) We start to apply Gloss over the top. Ive added a little black oil paint to the burnt umber to give an engine grease look to it.
You can see in the picture above that a milky residue is left over, don't worry about this. It soon fades and your left with the result.
And here is the dry result. Ive not put it everywhere ive put oil paint as that would stop these parts looking so unique. My reasoning is that these sections of the track would be unscrewed to grease the tracks from the inside, thus lots of residue. surrounded by older dryer residue around it. A decent result.
2: Tracks. This section took a lot of experimentation. So im just going to show you my final result and bullet point the steps I took to get there.
- Black undercoat.
- Tin-Bitz mixed with gunmetal silver as next layer, total coverage.
- Wash of nuln oil GW ink.
- Dry brush of Gunmetal mixed with Doombull Brown.
- Light smattering of Light Earth weathering powder from Forgeworld mixed with water.
- HEAVY LAYER OF NULN OIL.
- Dry brush of 50/50 mix of Gunmetal and Chaos black.
- Apply Dry Mud weathering powder between track segments.
I genuinely think you can get the same result by just doing the last 3 steps of this but maybe you wont get the depth of rust and old used tracks as is achieved here. Good luck! And please feel free to get in touch if you have a better guide than this for tracks.
3: Weathering powders.
This section is more about how I have come to use these amazing tools than a tutorial. Buy all of Forgeworlds weathering powders immediately. They are beautiful. Dip a frayed brush (to pick up the powder) into the pot and tap your powder onto your pallet, mix with a brush full of water and just paint it on. Once it drys it looks like this. Add more water to dilute once its on the model. The pictures below are before and after I ran a wet toothbrush over it.
Too heavy.
Just right!
4: Peeling paint. This bit gets technical but its worth it's weight in gold. Lifted nearly verbatim from Forgeworld masterclass book this gives a beautiful result.
- Undercoat black.
- A mix of Gunmetal silver and darker silver are painted all over in a patchy way. (See image below.
- Coat in GW purity seal. Leave to dry.
- Coat in shop bought hairspray. Leave to dry.
- Airbrush your chosen colour, I picked a dark yellow. Leave to dry.
- Dip your brush into water then lightly rub onto surface. BAM! peeling paint.
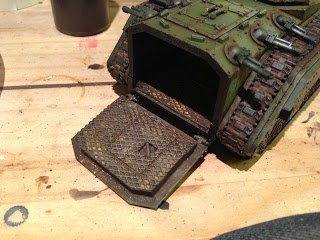
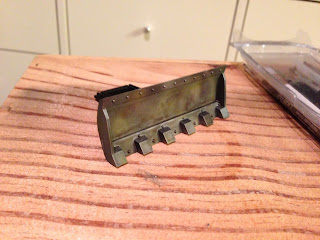
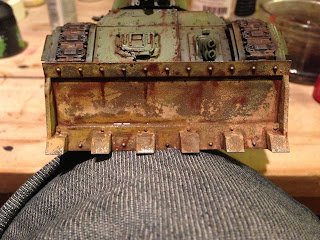
Here Ive added in a load of the techniques Ive gone over in the last few sections, lots of forgeworld weathering powder, oil leaking, and gloss varnish to give a wet mud effect. Just went to town on this beast.
The final touch is running an HB pencil along the raised edges of the metal. This gives the tiny highlight that might have been lost in my excitement over the dozer blades. Who doesn't like massive dozer blades!?
5: Finally a quick run down of a couple of tools I've used over the last two tutorials.
Bit of card with a corner cut off to use as a Mask for airbrushing.
Zest-it to use instead of white spirit. It's cheaper, easier to work with and it smells like oranges! I squeezed a little Burnt Umber into the bottle on the left and added a good inch of Zest-it. This is the most perfect brown wash you could ask for. It's what the dutch masters used.
And the right 3 colours are the only ones used on the tank if you want to replicate my colour scheme.
They are from Vallejo Model Air range. And work great straight from the bottle into an airbrush or pallet.
Well I hope this has been helpful!
Cheers for reading!
Monday, September 9, 2013
Tutorial: Tank Weathering Part 1
Here we are, I have been promising a weathering tutorial for a while now and here it is. There are a couple more stages to go but here are the first steps. I hope this is comprehensive enough for you guys and thank you for all your support during my Armies on Parade board and other endeavors. The techniques outlined here are from chats, Forgeworlds masterclass books, online tutorials, professional painters, my own background as a professional artist and the destruction of many models in my youth.
Just three shades of green were used over a black undercoat. Applied by holding a bit of card to hold in place to mask and liberal use of the airbrush. This effect is possible to get out of a dry brush but its a hassle. I don't see why this effect couldn't be done using the GW airgun.
ENJOY!
1: Gradients to hull. This first step might seem strange and will look odd until we get further along. But the basic idea behind it is to give some interest to flatter surfaces, pointing your gradients in different directions as I have done helps greatly break up the models surfaces that would otherwise seem empty. Maybe giving the impession that a hull plate has been put on at an angle, or the light has caught a highlight. This has nothing to do with direction of light or OSL (Object Source Lighting) Just a great way to start an otherwise plain tank.
2: Edge Highlighting. Right this step is a bit of a bugger and again it might seem unnecessary but trust me. it creates a good result. Apply a bit of your chosen colour (the lightest you have painted the gradient with) to your brush and rub it all off on your hand/pallet so you are left with a tiny tiny amount of nearly dry paint still on the brush. Then drag your brush along the corners and edges. This doesn't need to be perfect, you aren't "edge highlighting" power armor and need to blend it or anything. This can be rough. Like the tanks been used and knocked about a bit and the top layer of paint has scraped away.
This also works to tie the model together.
3: Sponges. Love them. Learn to use them and use them all the time. If you have bought a model from GW or forgeworld you have sponges laying around. If you wash you have sponges. Sponges cost 50p from most shops. Use sponges...
I use a 50/50 mix of chaos black and doombull brown to make a deep dark rusty black colour to dab my sponge in. Don't press it straight onto the model! Test it on your hand or table or pallet before putting it on the model or you may end up with a massive chunk of black dripping down and ruining all your hard work. Be gentle and learn to love the sponge.
Less is more when it comes to sponging. Its tempting to go crazy and sponge the crap out of something. With this tank it had to look battered and well used but not destroyed. So little dabs around the raised areas and between plates, with only a couple of areas receiving larger splotches where perhaps the crew would swing themselves up into the cabin. Think about how this tank would be used. It makes the process bearable haha. and if you dab on silver or gunmetals be very very sparing. This denotes where the paint is all the way down to the bare metal. With these heavy tanks doing that would be hugely difficult.
4: Drips and leaks. This can be done with GW's Agrax Earthshade at £2.50 for a tiny pot. But for the best results get a tube of burnt umber oil paint for £1.50 and some white spirit for £1 and make yourself a lifetimes supply of perfect wash that GW cant touch for quality or price.
This bit isnt an art form. Run your wash of choice into the gaps and do a few layers of the wash to build up drips running down. Quick and beautiful result. Dont let people tell you that it doesn't dry because they dont know what they are talking about. A thinned layer like this will dry in about 5mins. Like most inks. Obviously the less you thin the longer it will take to dry.
You might also notice I've washed the edges with a bit of this wash mix too, again, to unify the painting. Bringing it together and making the tank look like a thing that belongs.
I hope this has been helpful! And join me next time for part 2. Weathering powders, gloss, chipping and how not to destroy things with weathering powders.
Labels:
40k,
airbrush,
armies on parade,
blending,
Forgeworld,
games workshop,
oil paints,
oils,
oils wash,
OSL,
peeling,
peeling paint,
Tau,
warhammer 40k,
washes,
weathering
Location:
Europe
Wednesday, September 4, 2013
Tuesday, September 3, 2013
Armies on parade tank bay
So, after much procrastination my armies on parade board is full steam ahead. With two weeks to go im cutting it fine. But stress is the father of doing things in a rush! So here is the tank bay first few layers of paint and rust. A couple more layers of bits a bobs and stick on some barrels and it should be good to go! Thanks for following!
Sunday, September 1, 2013
Oh snap. Armies on parade!
It continues! Board finally got a full on lick of paint and the first member of the Farsight 8 gets his armour shiz done proper yo! Word.
Also my first outing of the out of this world perfect iwata airbrush. Blimey. That is the shiz.
Subscribe to:
Comments (Atom)


.jpg)
.jpg)


