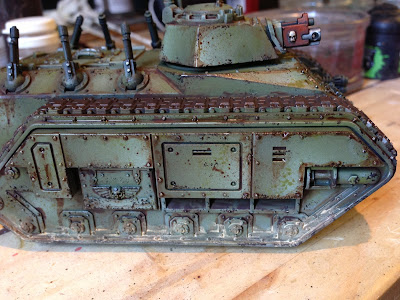
ENJOY!
1: Gradients to hull. This first step might seem strange and will look odd until we get further along. But the basic idea behind it is to give some interest to flatter surfaces, pointing your gradients in different directions as I have done helps greatly break up the models surfaces that would otherwise seem empty. Maybe giving the impession that a hull plate has been put on at an angle, or the light has caught a highlight. This has nothing to do with direction of light or OSL (Object Source Lighting) Just a great way to start an otherwise plain tank.
2: Edge Highlighting. Right this step is a bit of a bugger and again it might seem unnecessary but trust me. it creates a good result. Apply a bit of your chosen colour (the lightest you have painted the gradient with) to your brush and rub it all off on your hand/pallet so you are left with a tiny tiny amount of nearly dry paint still on the brush. Then drag your brush along the corners and edges. This doesn't need to be perfect, you aren't "edge highlighting" power armor and need to blend it or anything. This can be rough. Like the tanks been used and knocked about a bit and the top layer of paint has scraped away.
This also works to tie the model together.
3: Sponges. Love them. Learn to use them and use them all the time. If you have bought a model from GW or forgeworld you have sponges laying around. If you wash you have sponges. Sponges cost 50p from most shops. Use sponges...
I use a 50/50 mix of chaos black and doombull brown to make a deep dark rusty black colour to dab my sponge in. Don't press it straight onto the model! Test it on your hand or table or pallet before putting it on the model or you may end up with a massive chunk of black dripping down and ruining all your hard work. Be gentle and learn to love the sponge.
Less is more when it comes to sponging. Its tempting to go crazy and sponge the crap out of something. With this tank it had to look battered and well used but not destroyed. So little dabs around the raised areas and between plates, with only a couple of areas receiving larger splotches where perhaps the crew would swing themselves up into the cabin. Think about how this tank would be used. It makes the process bearable haha. and if you dab on silver or gunmetals be very very sparing. This denotes where the paint is all the way down to the bare metal. With these heavy tanks doing that would be hugely difficult.
4: Drips and leaks. This can be done with GW's Agrax Earthshade at £2.50 for a tiny pot. But for the best results get a tube of burnt umber oil paint for £1.50 and some white spirit for £1 and make yourself a lifetimes supply of perfect wash that GW cant touch for quality or price.
This bit isnt an art form. Run your wash of choice into the gaps and do a few layers of the wash to build up drips running down. Quick and beautiful result. Dont let people tell you that it doesn't dry because they dont know what they are talking about. A thinned layer like this will dry in about 5mins. Like most inks. Obviously the less you thin the longer it will take to dry.
You might also notice I've washed the edges with a bit of this wash mix too, again, to unify the painting. Bringing it together and making the tank look like a thing that belongs.
I hope this has been helpful! And join me next time for part 2. Weathering powders, gloss, chipping and how not to destroy things with weathering powders.


Excellent article, looking forward to part two! One thing I've always struggled with is weathering darker vehicles like black ones etc. For the sponge effect, what would you recommend? Grey paint for the chipping?
ReplyDeleteCheers dude! Part 2 will be with you tomorrow. Now. Black tanks. There is two ways to approach them one I've tried and one ill be covering further down the line. If you see a black piece of armor from medieval times the likelihood is that it's coated brass. Doing chips of gold looks brilliant. And will work wonders for most black armor. Second option is something called damage paint. When industrial machinery is painted they usually do it In two layers. Starting with a red base. This is so if there is a scratch the damage will be instantly obvious. Rather than be lost in the black. For the basics I would heavily darken some gun metal or tin bitz.
DeleteCheers for reading
H